 Help
Help
Configuring a Draytek Vigor Router
- 15 February 2024
- 7 December 2023
- Exa Support
Configuring a Draytek Vigor Router
If this is the first time the Draytek Vigor router is being set up, you will need to configure the device in order for it to work with your connection.
The three types of connections that may require a Draytek router are ADSL, FTTC & FTTP.
Configuring WAN
To begin, connect your device to the Draytek via LAN Port 1. You will then need to edit your adapter settings to the following:
IP address: 192.168.1.2
Subnet mask: 255.255.255.0
Default gateway: 192.168.1.1
DNS server: 8.8.8.8
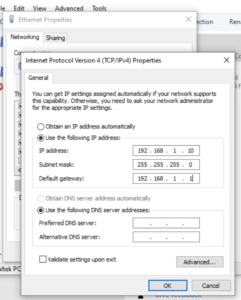
Once saved, open a browser and make a search for 192.168.1.1, this will bring you to the router login page.
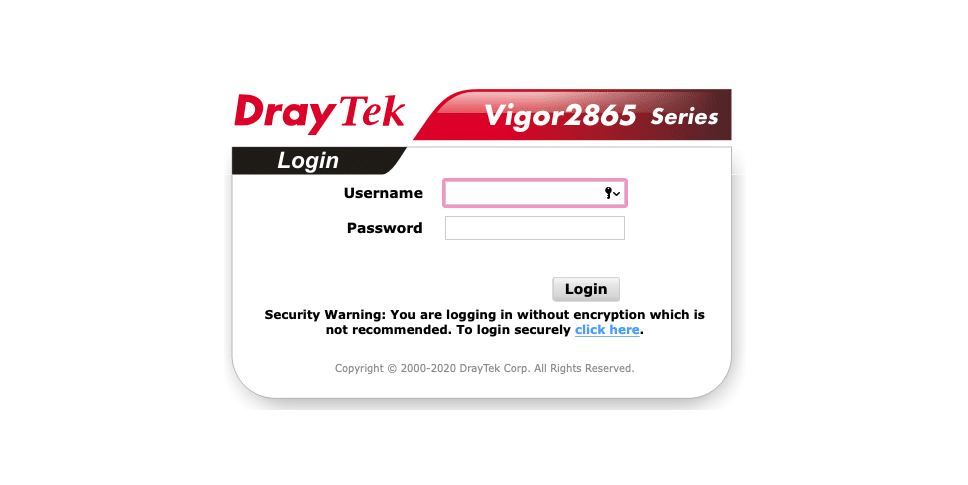
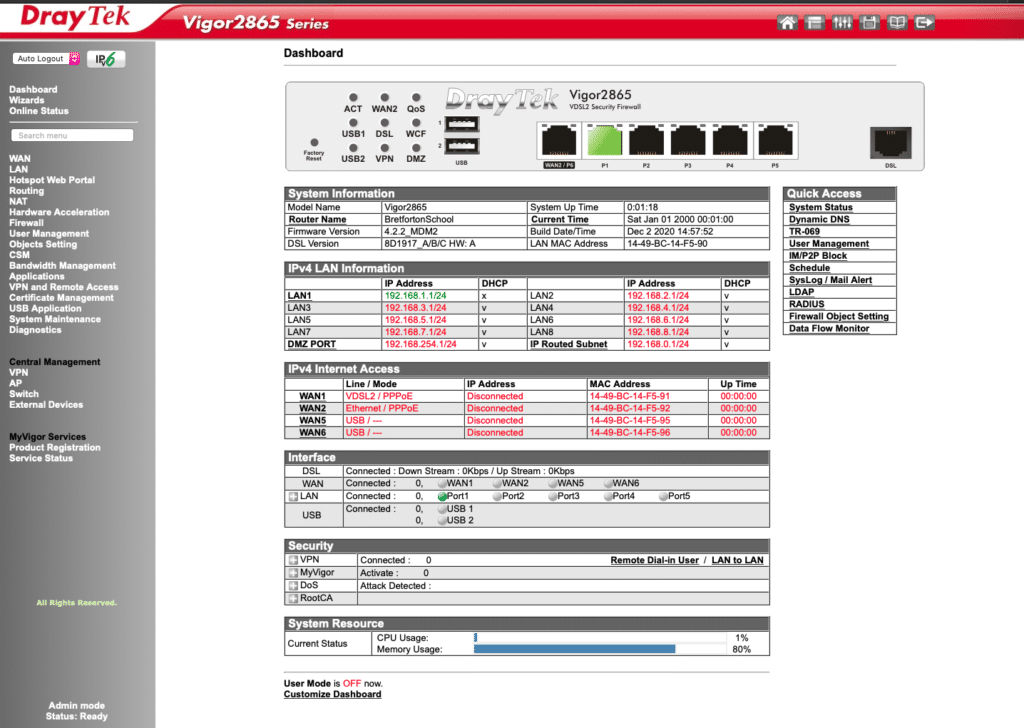
The default username and password are both ‘admin‘. Once logged in, you will see the dashboard.
If you are configuring the router for an ADSL connection, you will need to disable the VLAN tag for VDSL2 as this is not required for an ADSL connection.
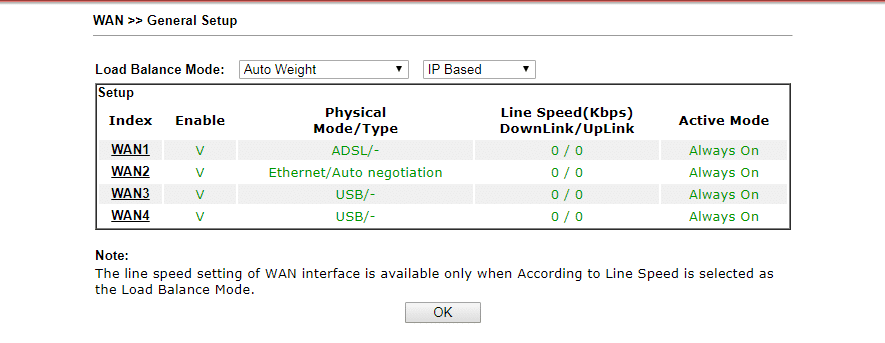 1. Go to ‘WAN’ on the menu section on the left-hand side of the page
2. Go to ‘General Setup’ and you will see the WAN1 section
3. Disable ‘VDSL2’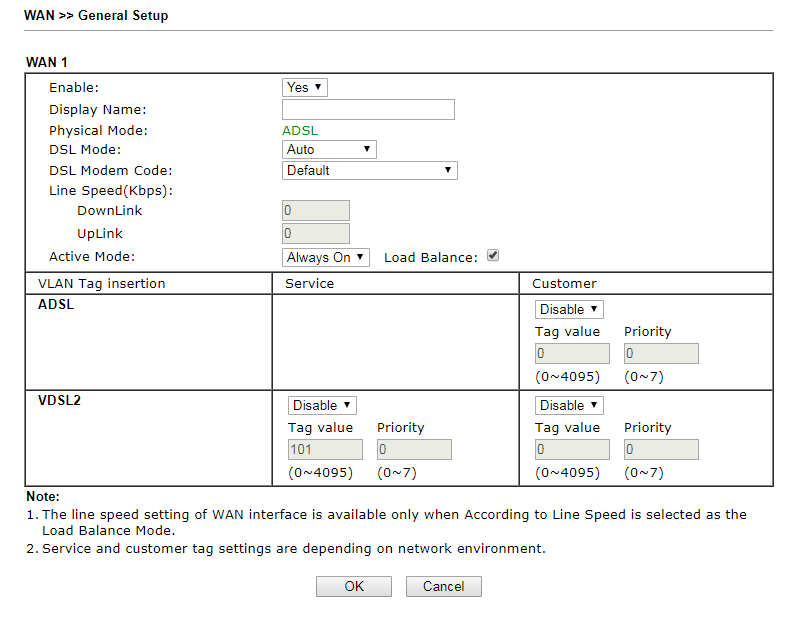 4. Next, go to ‘WAN’ and then ‘Internet Access’
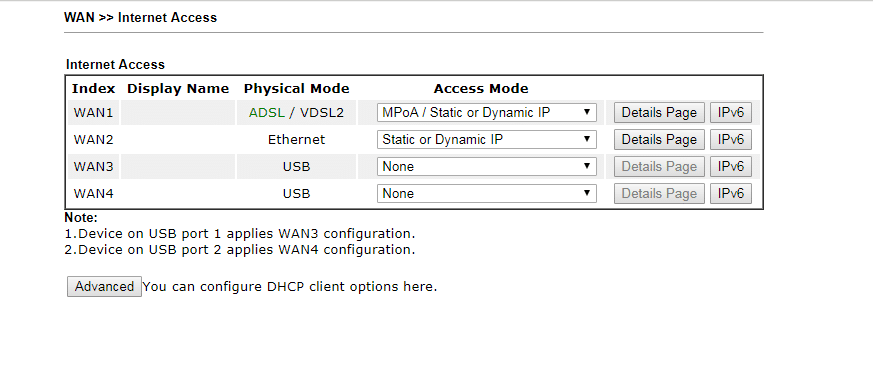
5. Select WAN1 by clicking on the ‘Details Page’
6.Enter the ‘Username’ and ‘Password’ you can find these details on your account page on the Exa Panel. Make sure to enter the realm as well.
7. Make sure the port is enabled by clicking ‘Enable’ in the top left corner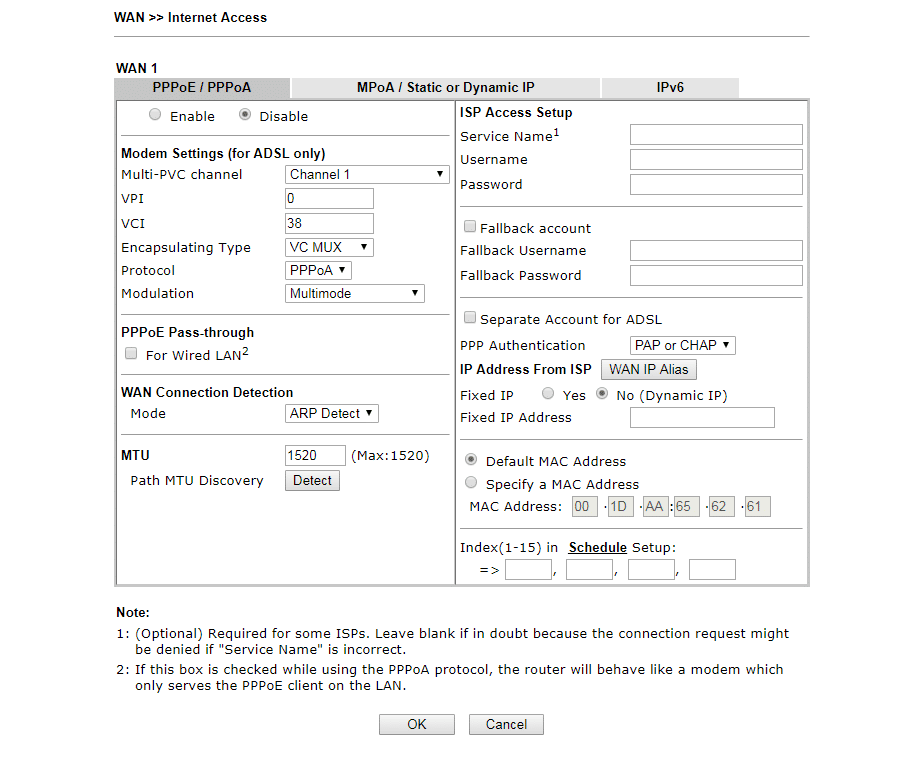
If you are configuring the router for an FTTC connection, you will need to enable the VLAN tag for VDSL2 as this is required for an FTTC connection.
- Go to ‘WAN’ on the menu section on the left-hand side of the page
- Go to ‘General Setup’.

- Under WAN1, enable the VLAN tag for VDSL2 with a tag value of 101, which controls the sync on the connection.

- Go to ‘WAN’ and then ‘Internet Access’.
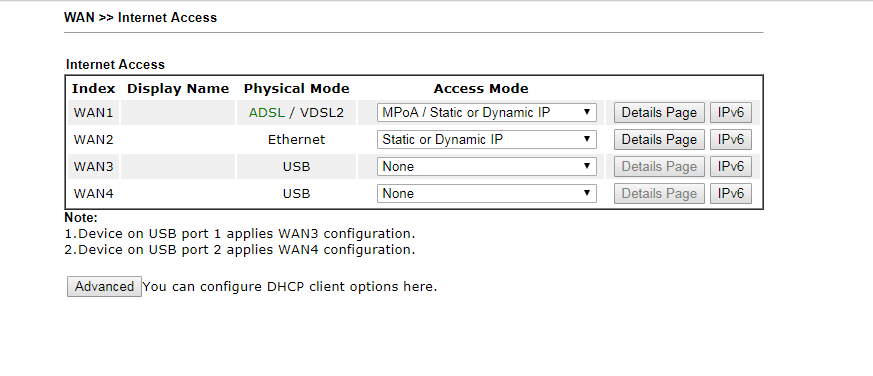 5.Select WAN1 by clicking on the ‘Details Page’.
6. Enter the ‘Username’ and ‘Password’ you can find these details on your account page on the Exa Panel. Make sure to enter the realm as well.
7. Make sure the port is enabled by clicking ‘Enable’ in the top left corner

If you are configuring the router for an FTTP connection, you will need to disable the VLAN tag for as a modem will handle this.
- Go to ‘WAN’ on the left-hand side of the page
- Go to ‘General Setup’.
- Under WAN2, disable the ‘VLAN tag‘.
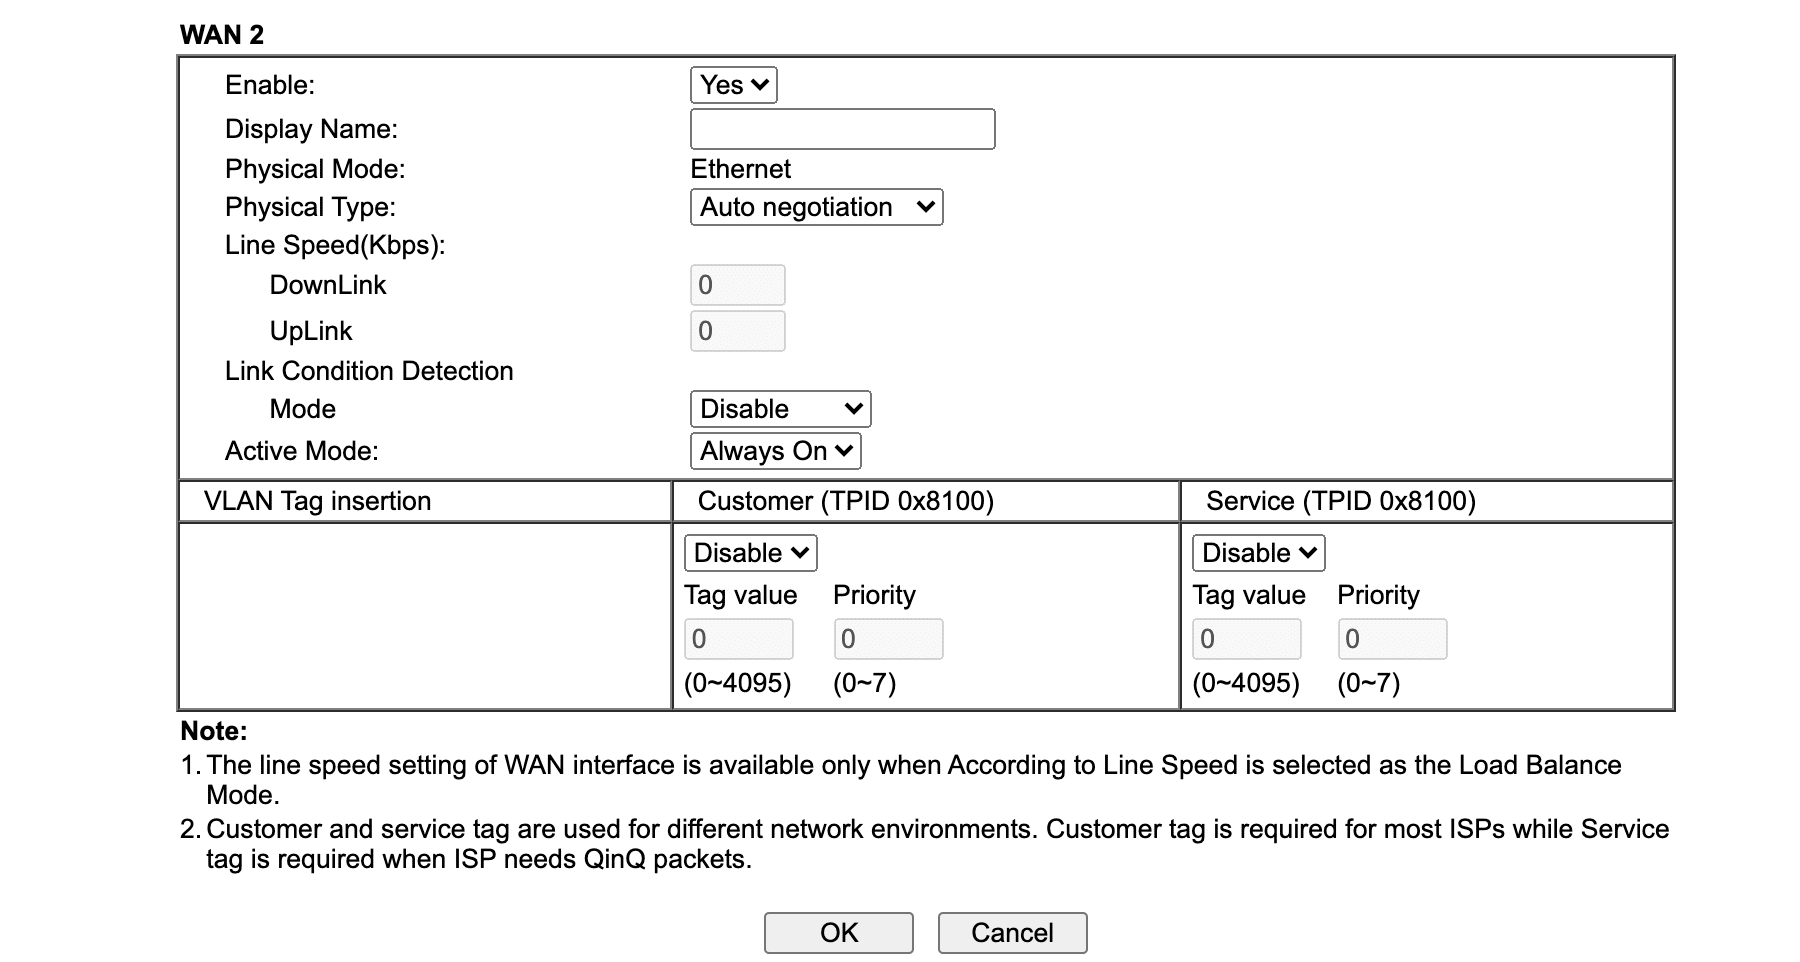
4. Go to ‘WAN’ and then ‘Internet Access’.
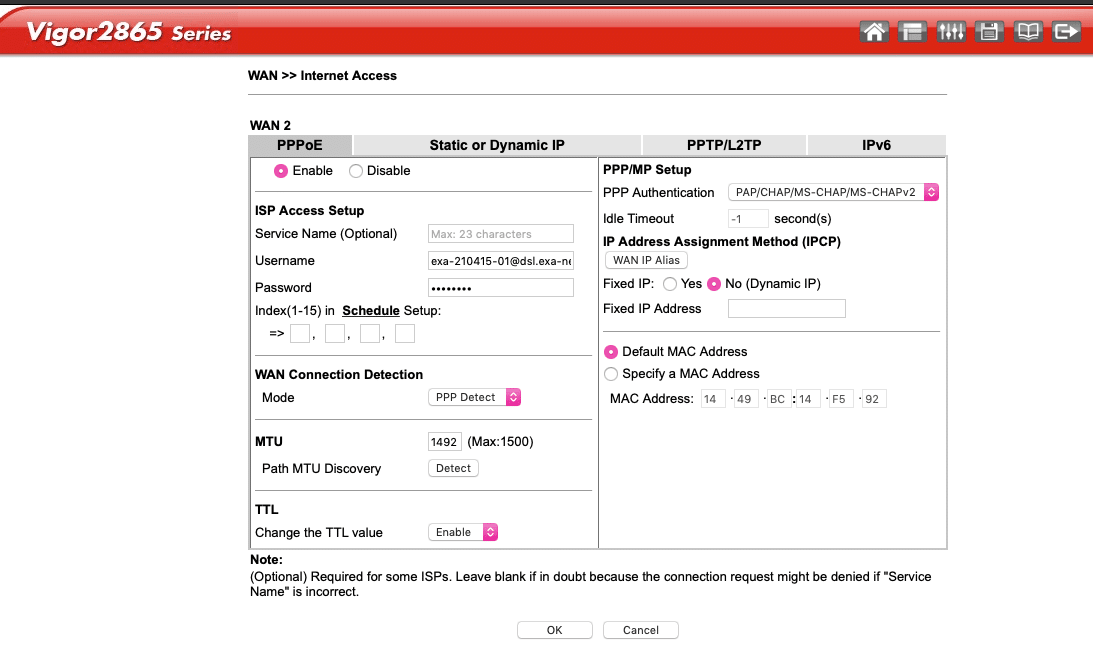
5. Select WAN2 by clicking on the ‘Details Page’
6. Choose ‘PPPoE’ from the drop down
7. Enter the ‘Username’ and ‘Password’ you can find these details on your account page on the Exa Panel. Make sure to enter the realm as well.
7. Make sure the port is enabled by clicking ‘Enable’ in the top left corner
Configuring LAN
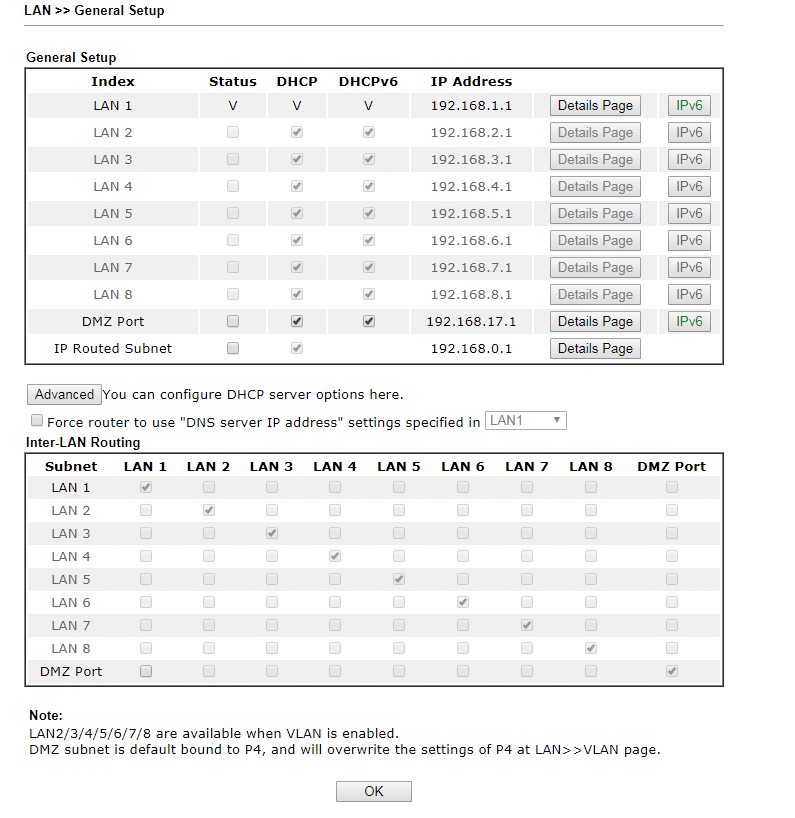
- Access the “LAN” option on the menu on the left side
- Click on “General Set Up” to access the LAN configuration page.
- Next, select the “Details Page” option for the LAN port you want to configure. This will bring up a page where you can enter the specific details for the school’s network.
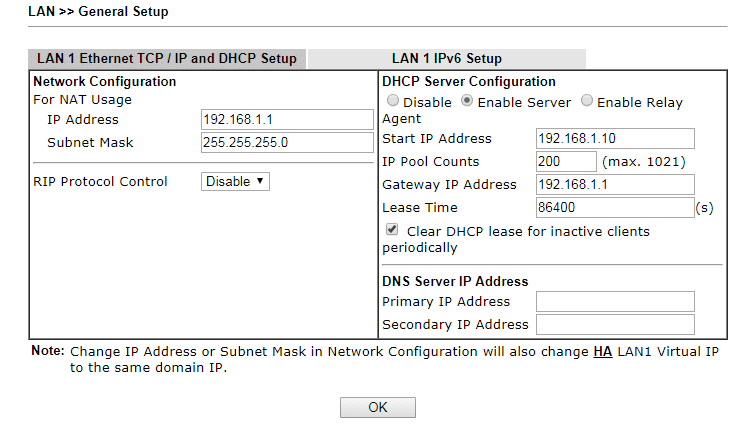
4. You will then see the below. Enter the LAN details such as the default gateway, subnet mask, and DHCP.
Configuring System Maintenance
This guide will go over configuring the system maintenance on a Draytek router
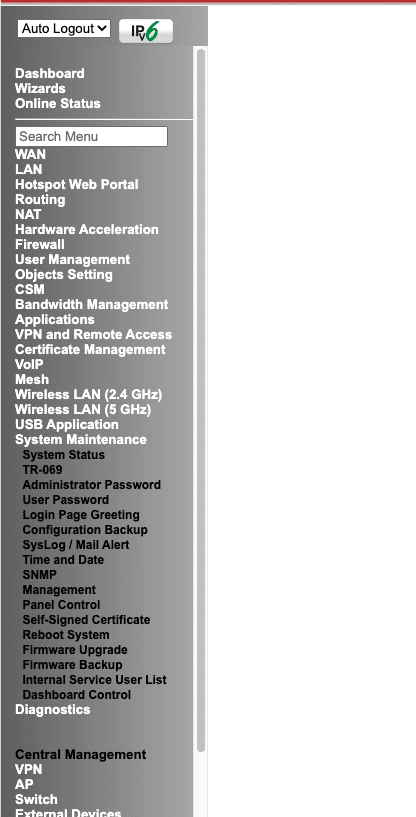
Once you are logged in, you will see a dashboard with different options. Look for the ‘System Maintenance’ option on the left-hand side of the page and click on it. This will open the settings under system maintenance.
The first thing to change is the Admin password.
Under the ‘System Maintenance’ option, look for the ‘Administrator Password’ section. Change the password to a strong and unique one.
Then you can go into Management, if you need to set anything up on there.
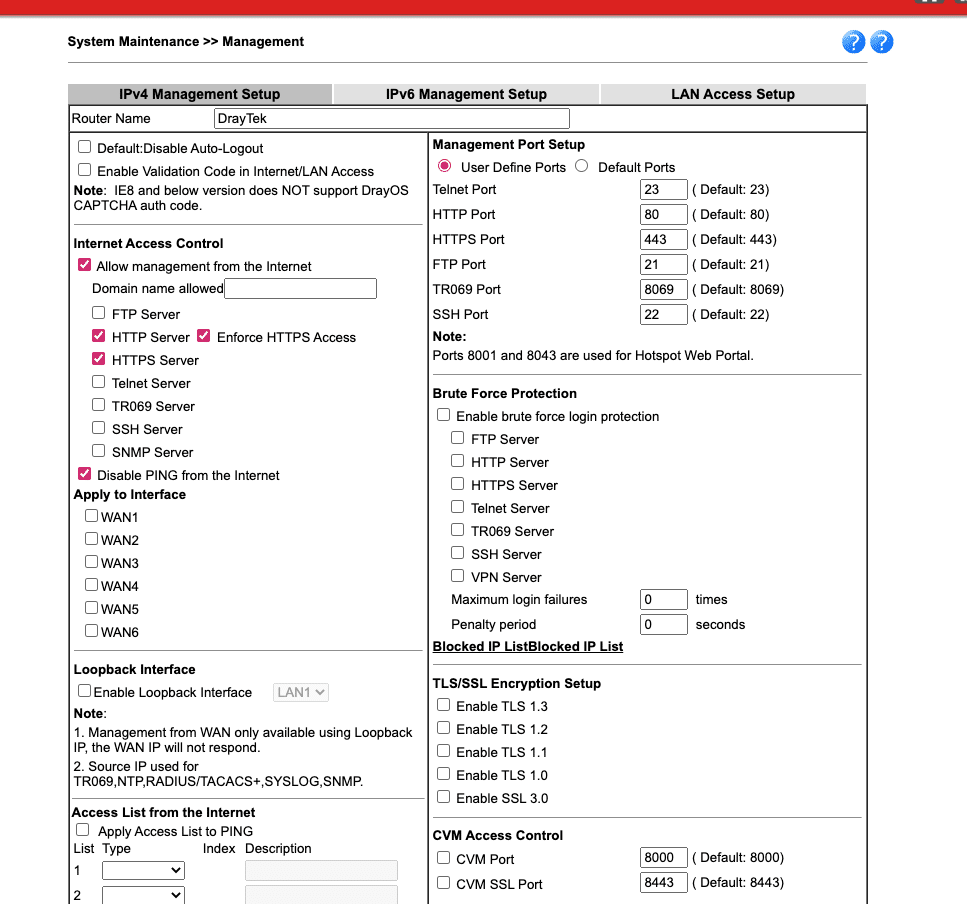
To access your router externally you will need to configure the management settings, these sit under ‘System Maintenance‘, ‘Management‘ and under management you will see a section called ‘Internet Access Control‘.
Also note you should change the HTTPS port as 443 is the standard web port which is easily indetifiable and is used for SSL VPN which can cause conflictions on the VPN set up. We would advise changing this to 4433
Save and Return: After configuring all the settings, click on ‘Save’ to save the changes. The router will require a reboot at this stage.
Note on HTTP: Finally, note that HTTP is disabled by default, which is correct as it is not a secure protocol for access. Use HTTPS instead for secure access to the router.
Inbound & Outbound NAT
WAN IP Alias
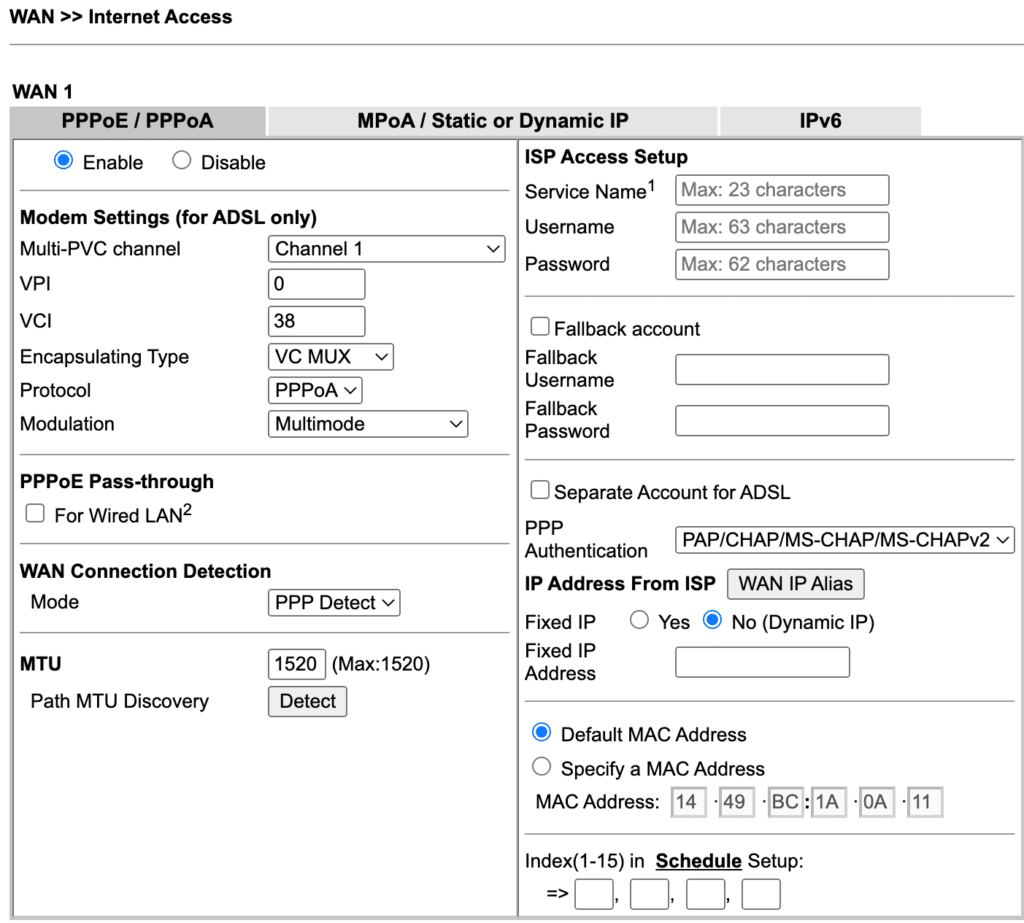
If you need to set this up, go to WAN > Internet Access.
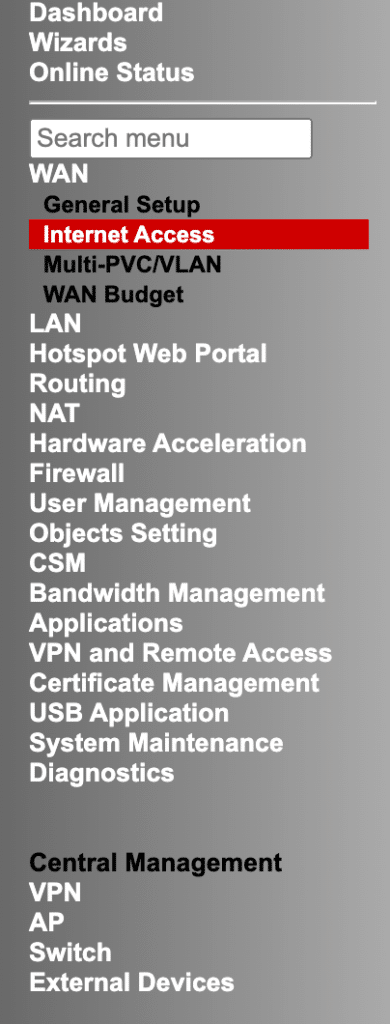
Click on ‘Details page‘ for the specific WAN you wish to crete a WAN IP Alias for.
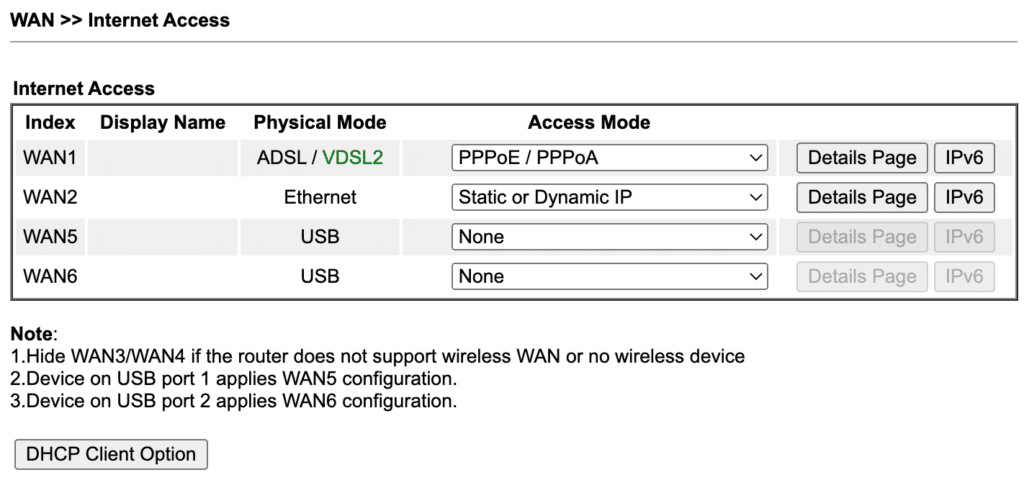
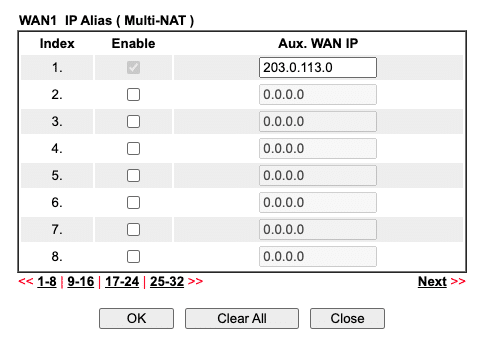
Then click on ‘WAN IP Alias‘
Add the WAN IP into the list and tick ‘Enable‘
Inbound NAT
Before setting up an Inbound NAT you need to make sure a WAN IP Alias has been configured, if it hasn’t please follow the above steps.
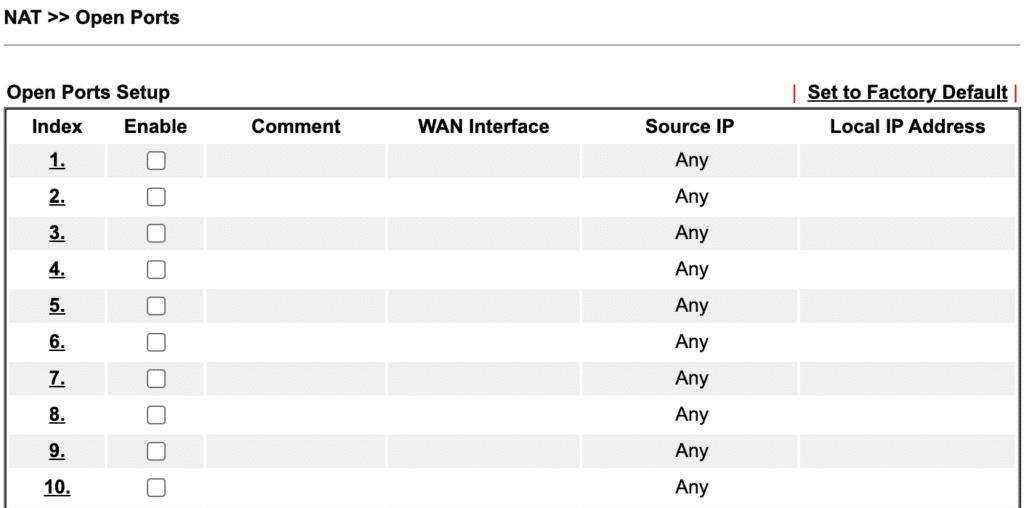
Once you’ve done that, go to NAT>Open Ports
Now click on the 1 in index, or the next available option if that one is already in use.
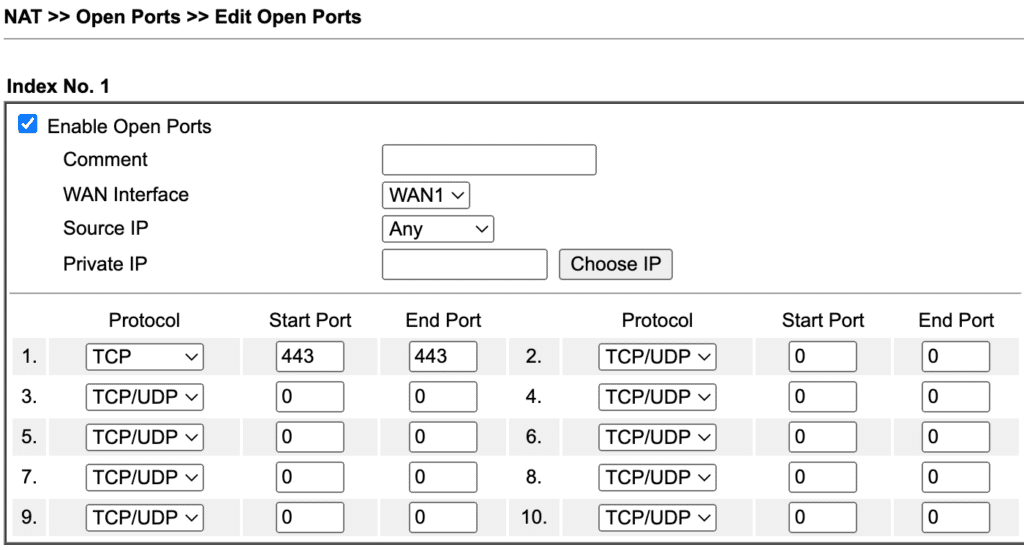
You will then be taken to the following page where you can add the IP and ports you want to be forwarded.
Outbound NAT
Following these steps will help you configure outbound NAT and load-balancing/route policy on your Draytek router, which can help improve your network performance and availability.
Before setting up an Inbound NAT you need to make sure a WAN IP Alias has been configured, if it hasn’t please follow the above steps.
Click on Routing and then Load-Balance/Route Policy.
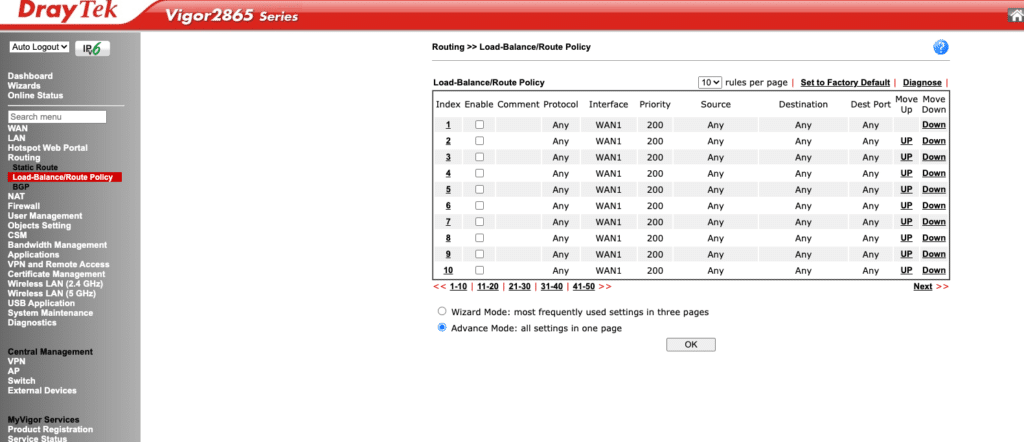
Select one of the index numbers to create the rule on.
Protocol: Select the protocol “Any”
Source IP: Add the IP range you wish to use for the Load Balance/Route Policy rule.
Destination IP: Select “Any” for the Destination IP,
Destination Port: Select “Any”
Interface: Select the WAN interface and the public IP address you wish to use for the rules.
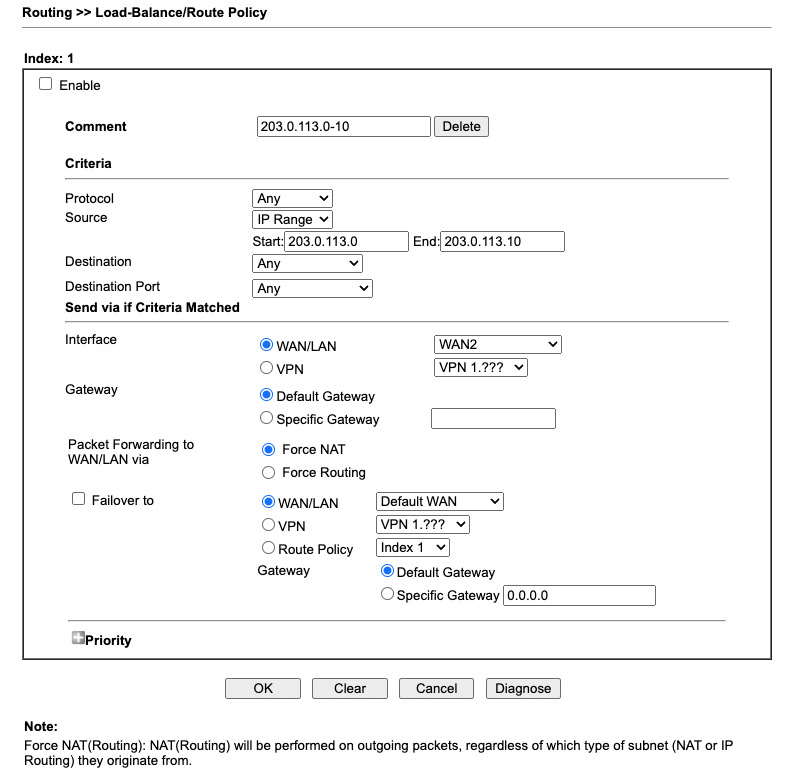
After you’ve created the rule, it will be displayed within the routing table.
If you’re looking at how to configure VPN for LAN to LAN click here
Suggested Next Read


