 Help
Help
Create a SurfProtect filtering profile
- 17 April 2024
- 7 December 2023
- Exa Support
Create a SurfProtect filtering profile
Clicking on a specific location from the location overview list will take you to a summary for the selected location. This page is broken down into a number of sections.
Services filtered by this location
This section lists all connectivity services which are being filtered in this location.

Filtering profiles
Filtering profiles are split into two types, Overriding profiles and the Default profile.
The Default profile defines the default filtering policy for a location.

Overriding profiles define exceptions to the Default profile. For Example you may want Teachers and Students to have different filtering policies applied to them.

When configuring a profile, either the default profile for a location or the overriding profiles, you will be presented with a number of distinct sections which define a profile.
Matching Rules
This section describes the rules for overriding profiles which, when matched, will cause a request to be filtered using the rules defined by the profile it matched on.

When viewing a location’s default profile these matching rules are replaced by a note that you are viewing the default filtering profile for the current SurfProtect location.
Note: The ability to match Internal IP addresses, SSO usernames or SSO user groups requires certain SurfProtect setups to allow SurfProtect access to that data. See the section on SSO integrations for different solutions and what data each gives access to.
Policy settings
These settings make up the core of a filtering profile, and are broken up into a number of manageable sections.
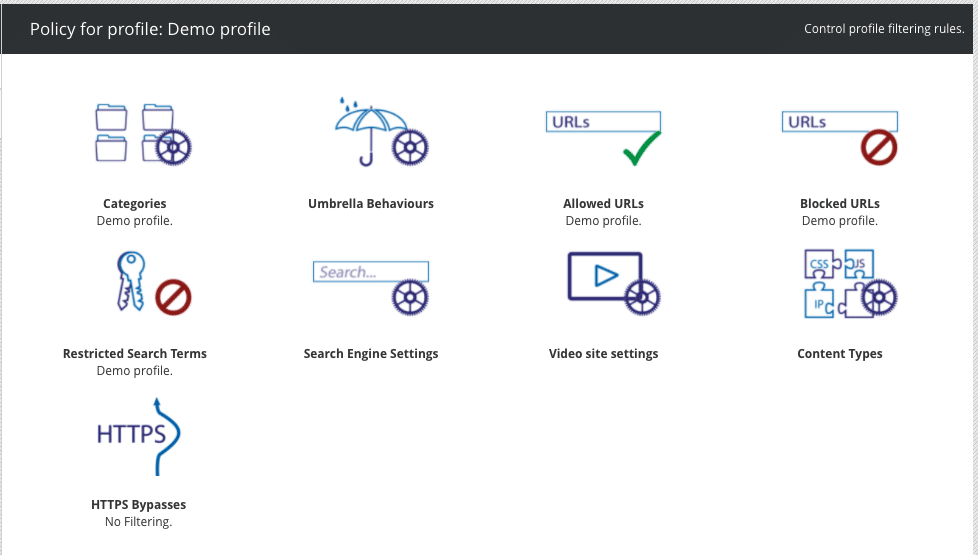
Categories

SurfProtect treats websites differently depending on how we have classified them. When a site is classified it will fall into a category, such as ‘Sports‘ or ‘Arts‘. A policy defining which categories are permitted or blocked on your connection is called a ‘list‘.
Underneath the icon you will see which category list is currently assigned. By hovering over the icon you can then choose an alternative list to apply (including an option to remove all category filtering), or edit the current list. Let’s look at editing a list; hover over the icon and choose ‘Edit‘.
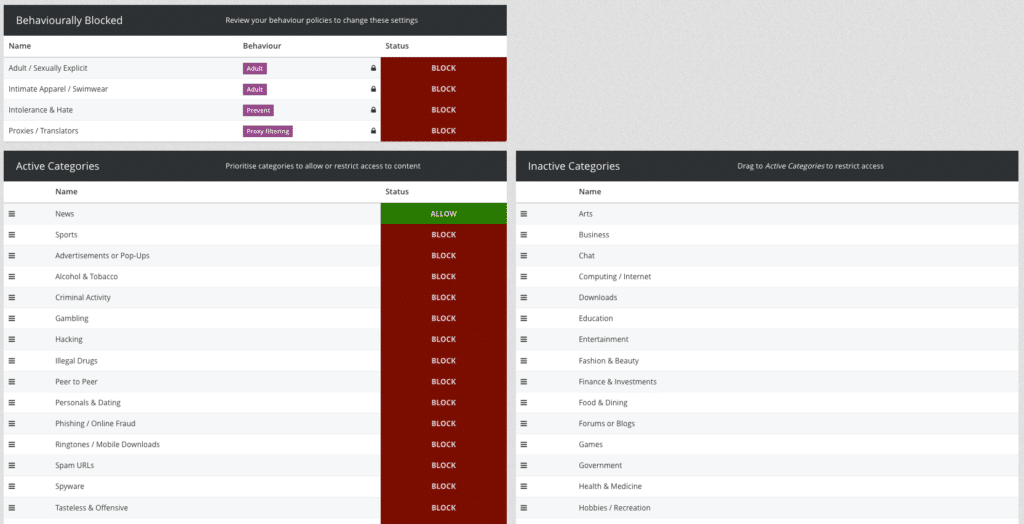
The first thing you will see is a list of categories that are blocked by your Umbrella Behaviour settings, with the middle column displays the Umbrella Behaviour that the category falls under. For your protection these cannot be unblocked here and must be done on the Umbrella Behaviour page. Click on the behaviour to jump straight to that page.
Lower down the page shows the active categories and their current status. You can change the status between ‘Block‘ and ‘Allow‘ by simply clicking the status indicator. You can also add in any categories from the inactive categories list on the right hand side by just dragging them over.
One of the features of the SurfProtect product is allowing you to order the list. This is made possible by a classification system which allows for a website to have multiple classifications. When deciding whether to allow or block a website, SurfProtect will work down this list and behave based on the first category the website matches.
Let’s take the ESPN website as an example. This website is classified as both sports and news. It might be that you would like news sites to be accessible on your connection, but not general sports sites. In this scenario you would place the category news above sports and set the status to ‘Allow‘ for news and ‘Block‘ for sports (see below). Now, SurfProtect will allow the page to be loaded as the first classification it matches in the list is news, which is permitted. However a site which is classified as sports, such as nba.com will continue to be blocked as sports is the first category in the list which nba.com matches.
Umbrella behaviours

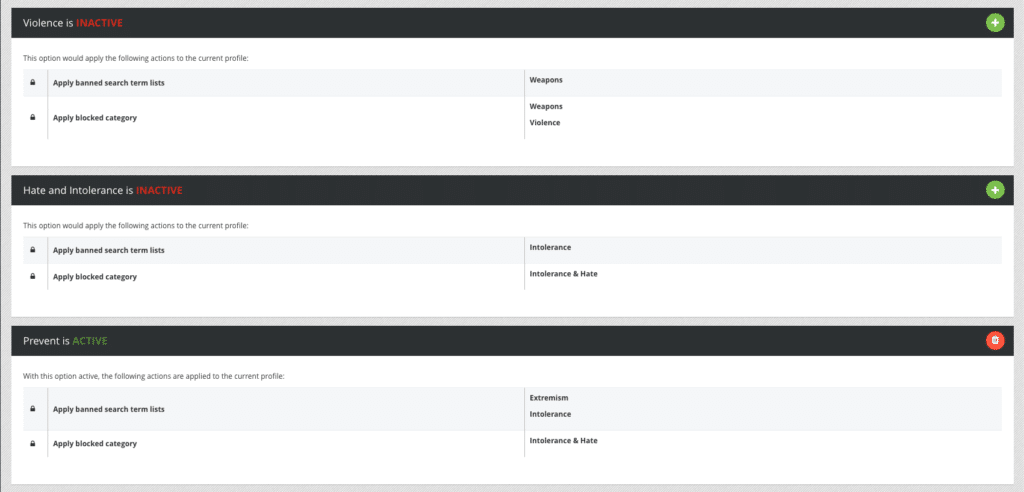
A new feature of SurfProtect is the ability to apply a group of settings in one click. For example, you can apply all relevant settings for ‘The Prevent Duty’ by simply clicking the ‘Prevent’ Umbrella Behaviour.
Click the ‘edit’ button icon, by hovering over the icon, to select the Umbrella Behaviours that apply to your policy.
The Umbrella page shows the available behaviours and their current status. It also shows you the search term categories and website categories that are applied by each Behaviour. You can easily toggle whether a Behaviour is active or inactive by clicking the plus or the bin
Allowed URLs

There may be a time where websites that would normally be blocked by your filtering policies are legitimately required. Here you can override your other filtering policies and explicitly permit access to a web page or domain.
Underneath the icon you will see which Allowed List is currently assigned. Hovering over the icon lets you choose an alternative list (including an option to remove all category filtering), or edit the current list. Let’s look at editing a list; hover over the icon and choose ‘Edit’.
Hit the + icon to add a URL to your allowed list. Either add the site by typing (for example) bbc.co.uk or permit the entire domain by adding a ‘.’ before – e.g. .bbc.co.uk.

The ‘Where is this used’ dropdown will show you what profiles are using this list.
The ‘Subscription Control’ dropdown will give you a share code of the list, as well as a way to enter another list’s share code. When you update a list, it will affect every list subscribed to it.
Blocked URLs

Blocked URLs work in much the same way as Allowed URLs above – you may become aware of a website that you do not want to be accessed on your connection – regardless of any filtering policies in place.
SurfProtect allows for inherited Blocked lists which are displayed at the top of this page. The eye shows you the sites belonging to the inherited list and the bin allows you to opt out. Note that the list remains there for you to opt back in at any time.
Click the + icon to add a URL to your blocked list. Either add the site by typing (for example) bbc.co.uk or to block the entire domain add a ‘.’ before – e.g. .bbc. co.uk.
Restricted search terms

Further to the ability to block websites, SurfProtect can also affect particular parts of a site. Search Terms are indicative of this ability. As an example, Search Engine sites can be allowed, yet the input of inappropriate words can be blocked.
Underneath the icon you will see which Search Term List is currently assigned. By hovering over the icon you can then choose an alternative list to apply (including an option to remove all category filtering), or edit the current list. Let’s look at editing a list; hover over the icon and choose ‘Edit’.
On the resulting screen you are shown the resulting restricted search terms. To add your own search terms, simply click +. You can add single or multiple terms by hitting enter after each keyword. Any user added search term automatically gets grouped for your convenience, under the ‘User defined entries’ dropdown.
You can delete manually added terms from your list – however, terms that are inherited from the categories can’t be deleted. Instead, you can opt out by clicking X. This will show an ‘opted out’ status, and by clicking X you can opt back in anytime. Terms belonging to Umbrella Presets will show a lock. These must stay active, so cannot be changed.
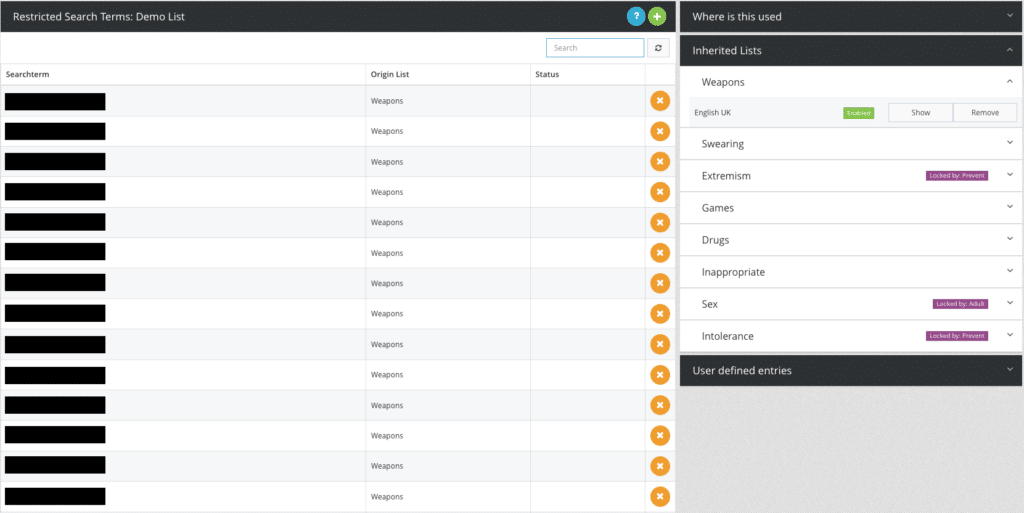
The ‘Where is this used’ dropdown shows all of the profiles that are using this list.
The ‘Inherited Lists’ dropdown shows all of the keyword lists used by SurfProtect
To view the keywords that are restricted by each list you can click Show button, to opt out of that category simply click the Remove button. You cannot opt out of lists inherited by umbrella presets, and these will display a lock icon.
The ‘User defined entries’ dropdown will display all of the additional search terms, as well as a way to remove them, or add extra.
Search engine settings

Here you can not only select your preferred search engine for your connection, but also decide whether to force your preferred search engine’s Safe Search feature.
Hover over the icon to access the search engine menu.

Video site settings

Hover over the icon to access the menu. From here you can force SafeSearch to work seamlessly with YouTube videos and other known video-sites.

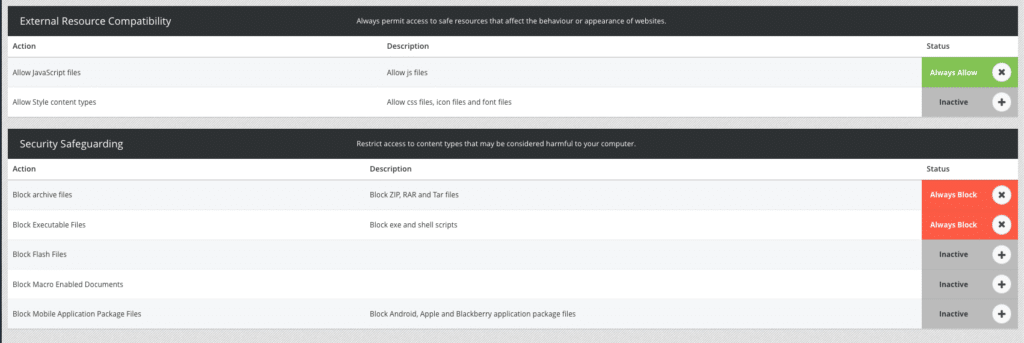
Content types

Note: By changing the status of either of these you are bypassing your current content-filtering policy and explicitly allowing this type of content to be downloaded regardless of their origin.
The lower section looks after the Security Safeguarding and allows you to always block the following, regardless of their origin:
- Archive files – such as Zip, RAR and Tar files
- Executable files – .exe and shell scripts
- Flash files
- Macro enabled documents – including macro enabled Word and Excel files
- Mobile Application Package files – Android, Apple and Blackberry applications
This can be particularly helpful to defend against harmful files that are disguised as legitimate programs and files.
HTTPS bypasses

Further than the ability to allow websites, SurfProtect can also avoid decrypting traffic from HTTPS sites. HTTPS bypasses is a list of websites that will not be decrypted when using HTTPS, which is used to allow trusted sites to be accessed.
Note: Not decrypting requests from these URLs will result in certain features being disabled. Specifically, the query string will not be available if the request is bypassed.
Underneath the icon you will see which HTTPS Bypasses list is currently assigned. By hovering over the icon you can then choose an alternative list to apply (including an option to remove all category filtering), or edit the current list. Let’s look at editing a list: hover over the icon and choose ‘Edit’.
On this screen you will be shown a table of bypassed sites. To add a new site to this list, press the + and enter the site you would like to bypass. This works similarly to the allowed and blocked URL lists, where you can add the site by typing (for example) bbc.co.uk or permit the entire domain by adding a ‘.’ before – e.g. .bbc.co.uk.

Advanced policy settings
The advanced policy settings contain the more powerful, behaviour changing tools.

Decrypt HTTPS
This option allows you to toggle if HTTPS decryption happens when using this profile.
When this option is enabled HTTPS requests are decrypted, allowing SurfProtect access to the entire URL, along with the data for the request itself.
When this option is disabled then HTTPS requests are not decrypted, greatly reducing the effectiveness of filtering. This limits SurfProtect to only being able to see the host name for a URL and removes the ability to read the data for the request itself. For search engines, this disables the ability to filter keywords.
This feature also removes the requirement of having the SurfProtect certificate trusted on the devices, since it will not be used.
Suggested Next Read


