 Help
Help
SurfProtect Reporting tools
- 15 February 2024
- 7 December 2023
- Exa Support
SurfProtect Reporting tools
These tools allow for you to get an overview of the web activity that your SurfProtect service has filtered.
Website Analytics
Website Analytics provides an overview of all web requests made within a queried time period, providing information about when it happened, who did it, what they did and what the filtering decision was.
This is broken down into a number of easier to digest sections:
Query Options
These options allow you to filter the Analytics results to a more limited set of results.

The first three of these options are broad, quick filters which can be applied to the displayed results. By default, the ‘All’ filter is selected, which shows every request that has been filtered. Switching to the ‘Permit’ or ‘Reject’ filters shows only results which either have a Permitted or Rejected status.
The final option, the search icon, allows you to filter results in a much more granular way.
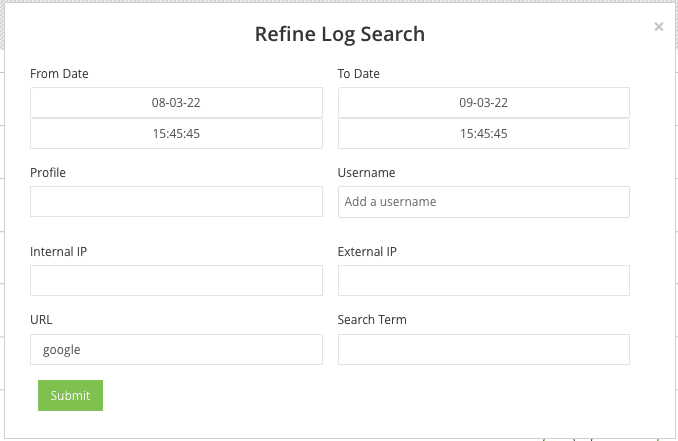
This allows you to filter results down to specific time periods, internal or external ips, users, etc. The ‘All’, ‘Permit’ and ‘Reject’ options can be enabled, which will limit the results further to these specific statuses.
When these more advanced filters have been set, you can see them listed beneath the activity graph.
Activity Graph
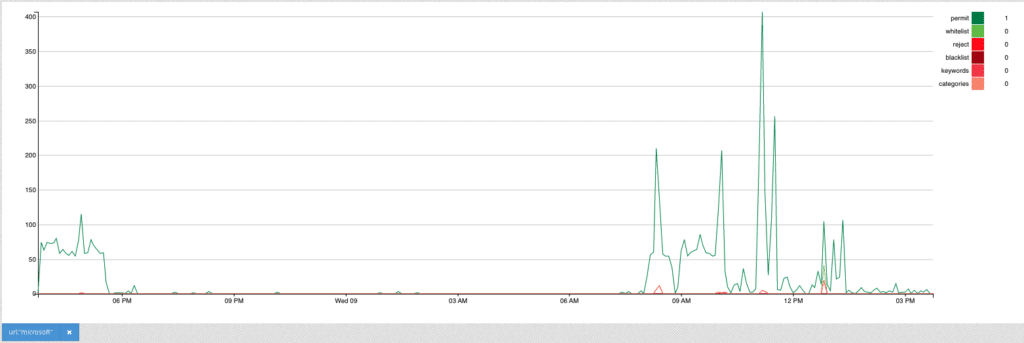
This graph shows the rate of filtered requests over the queried time period. Requests are grouped into five-minute intervals so that the volume of traffic being generated over these time periods can be more easily visualised at high resolution.
The data in this graph shows permitted and rejected requests independently, however currently it is not possible to filter these results further and will not update to match the filters that are set.
Activity Logs
The final section of this page is the Activity logs themselves, which show data about every filtered web request that has been handled by your SurfProtect service. These logs are split into four tabs of data:
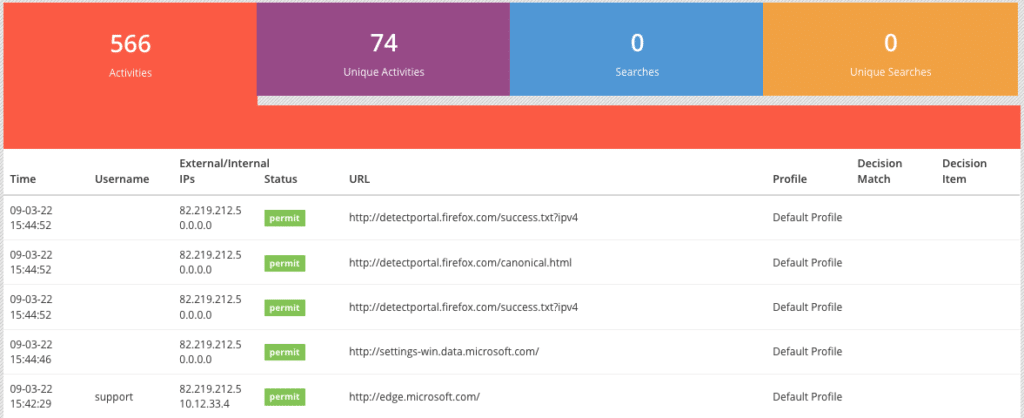
Activities: This is the most granular set of logs, showing every request in the order it happened during the queried time period, limited to the query filters set by the user.
Unique activities: This is an alternative view of the Activities logs. In this view you can see all of the unique activities, how many times each has happened, when it first occurred and when it last occurred within the queried time period. Some information is not shown here, like usernames, as this view is focused on the number of occurrences rather than the specific logs.
Searches: This is a view of all the requests seen by the filtering where an identifiable search query was found, again limited to queried time period and query filters.
Unique searches: This is an alternative view of Search logs. In this view you can see all of the unique searches which were performed, how many times each has happened, when it first occurred and when it last occurred within the queried time period. Some information is not shown here, like usernames as this view is focused on the number of occurrences rather than the specific logs.
Real-time Alerts
SurfProtect Real-time Alerts is a monitoring system that looks for specific types of behaviour when users are web browsing. When a set of requests within a given timeframe are identified as something that should be reported upon, an incident is created with those requests as events within it.
The interface on the panel allows a user to view and manage these incidents as they are reported.
Reports
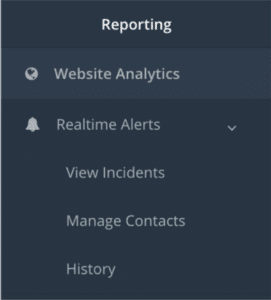
When viewing the SurfProtect panel, if the user has been granted access to view Real-time Alerts, a menu option under the Reporting area will be visible (as shown in the image).
From this menu users are able to view and/or manage three different aspects of Real-time Alerts; Incidents, Contacts and History.
If you are unable to see this menu this may be due to the following:
Your user credentials are not associated with the ownership of the SurfProtect service.
The user you are logged in with does not have sufficient access rights to view Real-time Alerts
Managing logins
Due to the sensitive nature of the data available, specific access rights must be granted to access the panel. The ability to access Real-time Alerts can only be granted by an existing user of that account.
For example, if a user needs to be able to view your Real-time Alerts then the Admin user can either grant an existing user access or create a new user with access.
Once logged into the self administration panel, existing user logins for the account can be managed from the user menu in the top right hand corner.
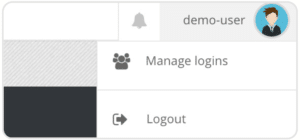
Selecting the ‘Manage logins’ menu option will navigate to show the list of all user logins for the account. This page then allows for the creating and updating of those users.

To create a new user account, and grant Real-time Alerts access, simply click the plus button in the top right corner of the Login Management table. This will open the user creation dialogue, which takes the following values:
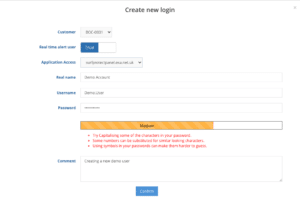
Customer: The customer you would like to assign the new user to.
Real time alert user: A toggle that allows the user to access real time alerts data for the account.
Application Access: The applications the user is able to access. This will allow the user to access the full panel, or only the SurfProtect panel.
Real name: The full real name of the user.
Username: The chosen username for the user. This will be used to log into the application, and will be displayed on the panel after login.
Password: Password for the new user, which must at least meet the medium strength requirements to be created.
Comment: This section allows you to add additional comments. This is not required.
For existing users, toggling ‘Real time alert user’ on the Login Management table will prompt to either enable or disable the ability for the user to access Real-time Alerts data on the panel.
Managing contacts
This is the area where designated contacts for Real-time Alerts are setup and managed. A contact is defined as someone who should receive notifications about incidents (e.g. Safeguarding Officer/Lead). Each contact is made up of three parts:

Contact information: First name and last name
Contact method: Email is the only available contact method currently. In future alternative methods of contact may be developed
Locations managed: Identification of all Locations the User is to receive alerts for
Adding a contact who does not already have a user profile will only generate the alert emails and will not grant access to the Real-time Alert area within the panel.
Incidents
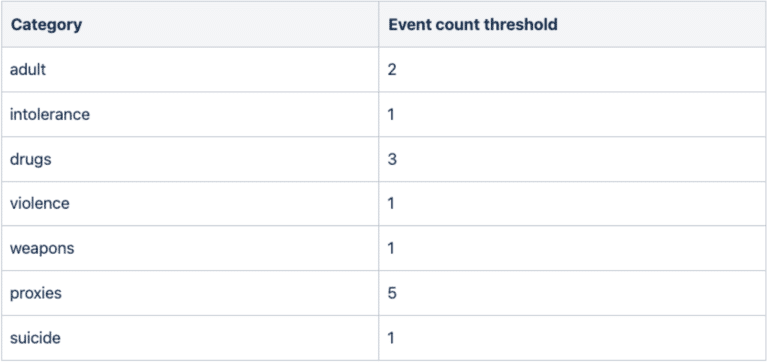
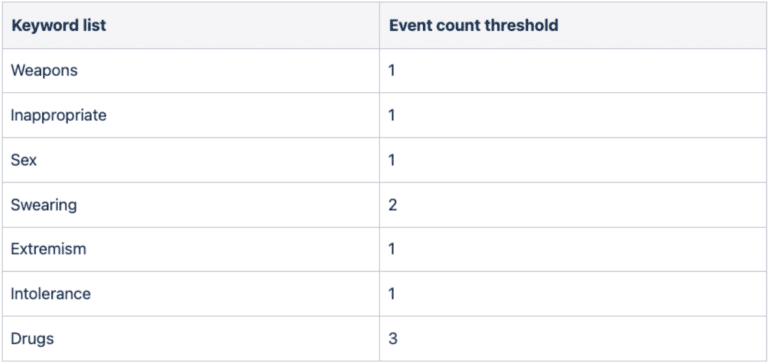
An incident is a one or more online activities (“events”) that are deemed to be potentially harmful. There are two types of incident, category and keyword. The number of events required to trigger an incident depends on the specific category or keyword.
Category
Attempts to directly visit a website with containing a specific type of category, as determined by SurfProtect’s content classification system.
Keyword
Attempts to search for restricted words or phrases from a given keyword list on websites like Google, Bing and Wikipedia.
Incident overview
This overview lists all incidents which have occurred within the SurfProtect service.
At a glance, each incident row allows you to view
- When the incident began,
- The incident’s current state.
- The SurfProtect location associated with the incident.
- The name of the staff member assigned to the incident.
- The username of the individual who generated the incident.
- The category or keyword list associated with the incident.
From here you can alter the state of an incident between Open, Assigned or Closed.
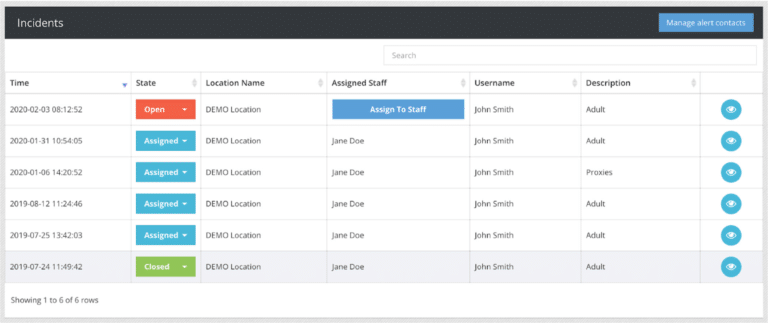
Open: New, unassigned incident. In this state you have the option to assign the incident to a specific staff member.
Assigned: Ongoing incident which is assigned to a staff member.
Closed: An incident which has been deemed as complete.
Select the eye icon , to view any incident in further detail
Viewing a specific incident gives a more detailed view of the incident as a whole, broken up into three sections:

Incident information: Gives you the same overview as was available on the incidents list; however in this view there is the option to reassign the incident to a different user and the unique identifier for the incident.
Comments: Lists any comments that users have made on the incident itself. Each comment record shows a time stamp, the user who commented and the comment itself. Click the plus icon on the right of the comments title bar to add a new comment.
Events: Shows every event that is linked to this incident. Each event is time stamped and provides the host that was visited. If the alert was raised due to a restricted keyword being searched then the search query and specific matched keyword will also be listed.

History
This section details all actions performed by users within the Real-time Alerts section of your panel. A single history record shows:
The time the action was actioned
What action was performed
Who performed the action
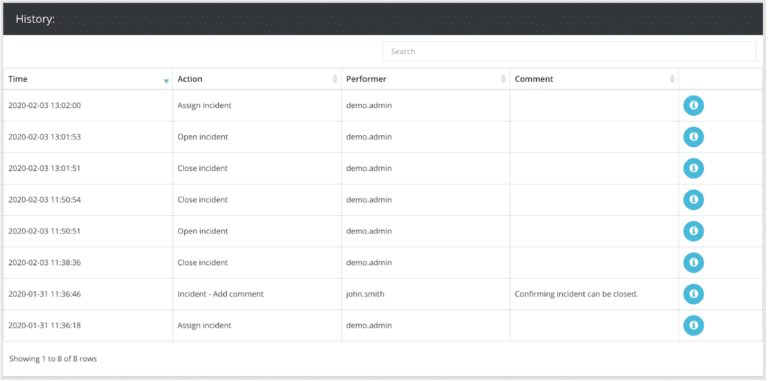
Alongside this is any extra information that was recorded about the action, such as who an incident was assigned to. Click on the eye icon on the right of each row to view any history record in further detail.


